How to Create A Custom Object In HubSpot With No Coding Required

The four standard objects that come pre-built in HubSpot (Contacts, Companies, Deals, and Tickets) are a great starting point for your CRM journey. For many companies, those objects will be all they ever need. However, there may come a time when you need to add a few more “nouns” to your HubSpot portal, like Inventory, Appointments, Events, or Members. This is where HubSpot Custom Objects come in! And luckily, the days of needing a developer to implement a custom object in HubSpot are a thing of the past. In this blog, we’ll cover:
- What Is A Custom Object?
- Why Are Custom Objects Important?
- How to Create A Custom Object With No Code
- Different Custom Object Use Cases
- The Last Sip
Let’s get caffeinated!

What Is A Custom Object?
As mentioned above, HubSpot has four standard objects, as well as a few HubSpot-defined objects, such as Products and Calls. However, when your business doesn’t fit within the bounds of the objects offered in HubSpot natively, you can call on custom objects to better suit your business needs. For example, if you run an educational SaaS company, you may want to create an object for Classes, Curriculum, Students, and Teachers. We’ll continue with this example for the rest of the article, but there are a countless number of use cases for custom objects, some of which we go over below.
Pro Tip: Keep in mind you’ll need an Enterprise subscription with any Hub in order to create Custom Objects in HubSpot.

Why Are Custom Objects Important?
If your data points will have a one-to-one relationship, you may be able to get away with using a custom property, like using a dropdown select to identify whether a contact in your database is a Student, Teacher, or neither. Conversely, if your data points will require a one-to-many relationship, custom objects are likely your best bet (like associating many students with one “Class” object, and many classes with one “Teacher” object).
Custom objects will be integral in keeping data organized and actionable, as well as being able to produce better reporting and visualizations compared to using a custom property. They'll help you reduce the manual efforts of your internal teams, mitigate reliance on integrations, and ultimately allow all of your data to be displayed and categorized seamlessly within HubSpot.
For example, say you want to see which Classes are your most popular, and find out if there are any commonalities between them that you can gain insight from. You could create a custom multiple checkbox property for Classes, and check off the appropriate options for each contact in your database to see which have the most students – but then where would you hold the data on each class? Are they the most popular because they are all on a similar subject, because the teacher is amazing, or something else? It’s impossible to easily find out without using a custom object. In your custom “Classes” object, the subject, teacher, and all the other data you need would live in the Class record, making it easily accessible and reportable for your team.

How to Create A Custom Object With No Code
Until recently, custom objects could only be created via the HubSpot API. But alas, those times are gone! Now, you can create a custom object in less time than it takes to finish your first cup of coffee with HubSpot’s new Custom Object Builder.
To get there, navigate to your Settings > Custom Objects.
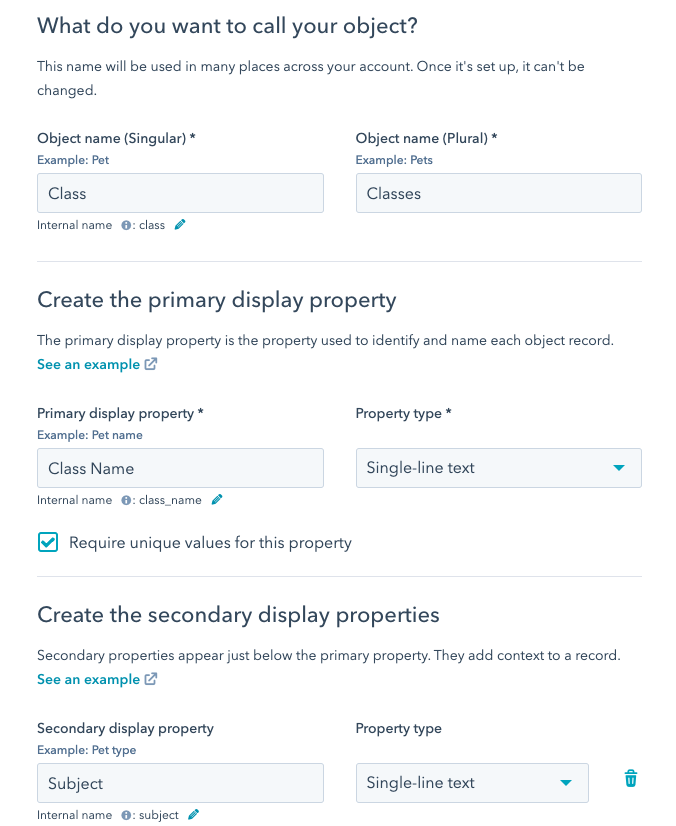
Hit the ‘Create Custom Object’ button, and you’ll be prompted to enter a few pieces of info: Object name (singular and plural), a Primary Display Property, and a Secondary Display Property.

The Custom Object Builder in HubSpot
The name of your object is pretty straightforward – for example, for our Classes custom object, the singular would be Class, and the plural would be Classes (rocket science, we know.)
The Primary Display Property is what will serve as the object identifier, and will show up at the top of each object’s record. This will usually be the Name value for the object (e.g. “Jane Doe” in the case of Contacts), and in our example, we’ll also set it to the Class’s name. But for other custom objects, it may be different. For example, if you had a Cars custom object, the Primary Display Property may be the Make and/or Model. You can also choose whether or not each record will require a unique primary display property (similar to emails for Contacts). If you want to have a unique identifier other than an Object ID, we recommend requiring unique values for your primary display property.
Your Secondary Display Properties will be what shows up directly underneath your Primary Display Property on an object record. You can choose up to two secondary display properties, and the first will also show up as a baked-in filter in your custom object view. In our example, we’ll use Subject as a secondary display property.

An example Class object record
After you’ve completed building your custom object, you’ll be able to navigate to it via the Contacts dropdown in your portal. Once created, you’ll be able to create and edit properties, add object associations, perform record customization, and do all the things you normally would with a standard object – directly from your Custom Object settings!
Pro Tip: If you’re a developer, you can still create custom objects using HubSpot API, which will grant you a bit more control over your custom object schema.

Different Custom Object Use Cases
While custom objects are great for holding internal data directly in HubSpot, they also hold a number of other use cases. You can use them for reporting purposes, email personalization, workflow triggers, and more.
Reporting With Custom Objects
The level of detail you’ll be able to report on increases vastly with custom objects compared to custom properties. You’ll be able to easily dig into the properties held within your custom object records with single and cross-object reporting, rather than having to create multiple custom properties and clumsily throw reports together to glean insights. Going back to our earlier example, with just a few custom Class properties, you’ll be able to report on which classes hold the most students, which teachers and subjects are the most popular, your total number of students over time, and plenty more.
Email Personalization
Custom object properties can also be used as personalization tokens in your automated emails. Say you want to include the book needed for a new class one of your students just signed up for – you could add a “Required Readings” custom property to your Class object, and include it as a personalization token in an automated email that goes out upon registration.
Custom Object Workflow Triggers
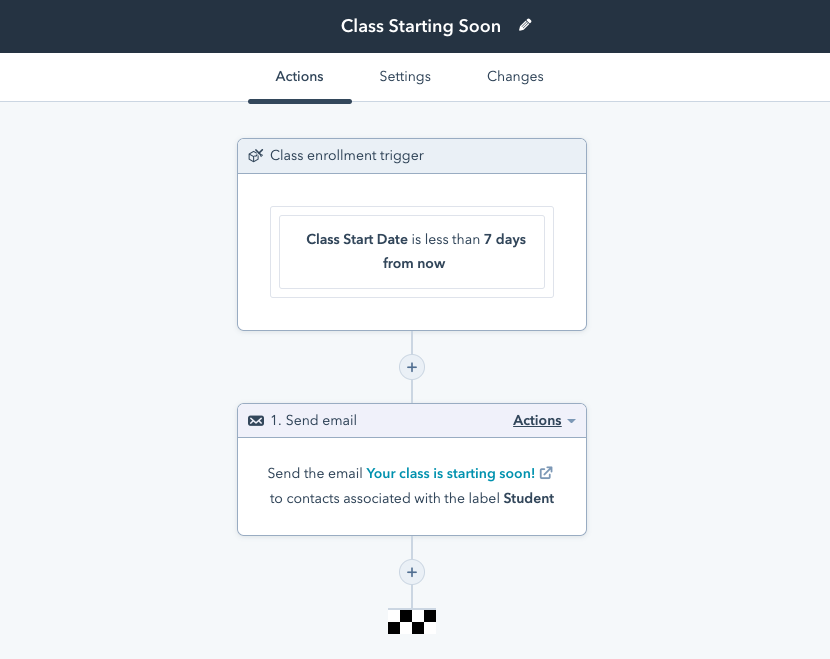
Automating communications gets easier using custom objects, too! You might be able to use a custom property to check which classes a contact is enrolled in, but what about holding the start dates of each class within their record as well? It’s nearly impossible using only custom properties. With a custom object, you can create a “Start Date” property for each Class, and trigger a workflow to send out an automated email to all its students whenever the start date is less than a week away.

A custom object workflow trigger example

The Last Sip
Custom Objects can be a powerful tool for any organization that needs a bit more customization in their HubSpot portal. As you’ll need an Enterprise-level subscription with any Hub in order to create them, they do require a decent investment (at least $1,200 / month), but they can truly be a game-changer for your business. And best of all, you can now easily implement them yourself, without the help of a developer!


